Be yourself; Everyone else is already taken.
— Oscar Wilde.
This is the first post on my new blog. I’m just getting this new blog going, so stay tuned for more. Subscribe below to get notified when I post new updates.
Be yourself; Everyone else is already taken.
— Oscar Wilde.
This is the first post on my new blog. I’m just getting this new blog going, so stay tuned for more. Subscribe below to get notified when I post new updates.
In my previous blog (https://erichprogramming.code.blog/2020/02/23/learn-autohotkey-part-2/) I went through and introduced you to GUI or Graphical User Interface. In this blog I will teach you how to access SQLite with AutoHotKey created by Just Me which you can find here: https://github.com/AHK-just-me/Class_SQLiteDB.
The prerequisites are the following: SQL queries is interacting in the database such as SELECT, INSERT, DELETE, UPDATE, how to create a script and how to run the script is needed. The basics can be found in the previous blogs in creating a simple script, in short understand the syntax, and how GUI works. Flow control is the flow of how the script is running and understand how an if statements works. To also add that wasn’t mention in the prerequisites list is that I will be going back and forth with Java as it is a common programming language and I’m very conformable with but it is not needed to understand the database.
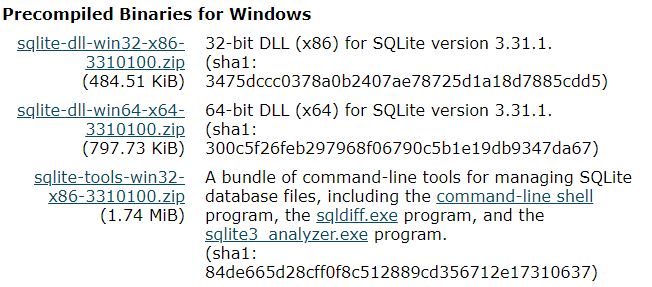
Link 1 is the SQLite database that we will be using, download the “Precompiled Binaries for Windows” and yes Windows because AutoHotKey can only be used in Windows. I only downloaded the 64-bit version, the SQLite tools are not needed.
Link 2 created by Just Me allows access to the database with AutoHotKey, click the hyper link “Download from GitHub” or download the master at the second link.
Link 3 is optional; this tool is used to see a GUI structure of the database that has been created and it’s not created with AutoHotKey.
First thing is to extract the zipped folder that was download, “sqlite-dll-win64-x64-3310100” folder is the first folder to extract and must be extracted next to the AHK script as we will use the #include directive or modify the #include to the extracted path.
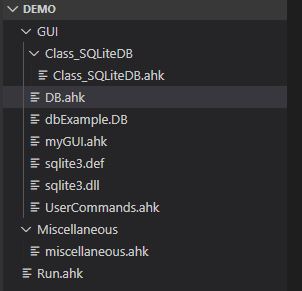
The file structure looks like this because in the next blog we will intergrate this DB concept with the GUI that was introduced in the previous blog. In this blog the new files are Class_SQLiteDB folder containing Class_SQLiteDB.ahk, DB.ahk(the script that we will run), dbExample.DB (The Database), Sqlite3.def, and sqlite3.dll.

To start off in the DB.ahk,we import the code of script for SQLite created by Just Me. create a variable for a database path to be read or create a new database if it doesn’t exist.

Here at line 11 we create an object of class SQLiteDB in the Class_SQLiteDB.ahk script. Next we open the database by using the method OpenDb and passing in three arguments first is the database file path, second is the access “W”rite, “R”ead, third a boolean whether the database should be created if the database file doesn’t exist. OpenDb will return false if there was any error that occurred during opening the database.

Database should be close whenever the job with the database is done, persisting any change and deallocate memory.
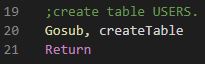
When we first create the database there will be no table in it, so we will create a table using label and Gosub that we learn previously.

In the createTable label we want to first create the query just like in Java but without the getConnection() as we already have the connection to the database. Creating the table is the same like SQL. What is different is that we use Exec() method to execute the query in the database (in java it would be executeUpdate() ), Exec() will return true or false, false being there’s an error and true if the execute update was successful.
To use the external tool that we downloaded, run the “DB Browser for SQLite.exe” executable located in the DB Browser for SQLite folder.


Once the database and table has been created we can use this external tool to verify that it was created by clicking on the “Open Database” at the top right and selecting the DB file that was created when the database was created.

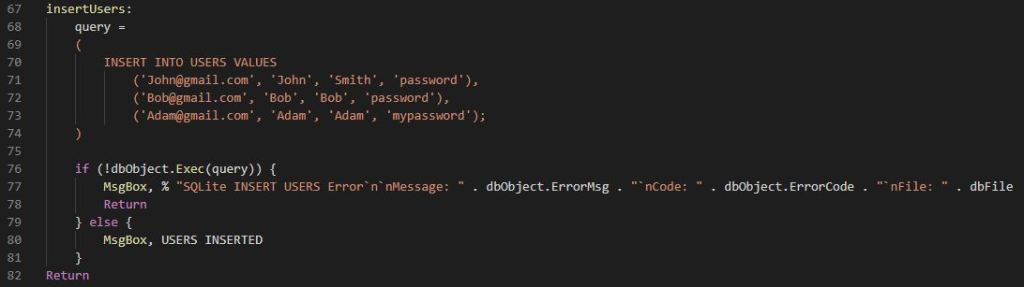
Inserting users query is also the same as you would in SQL using the INSERT.
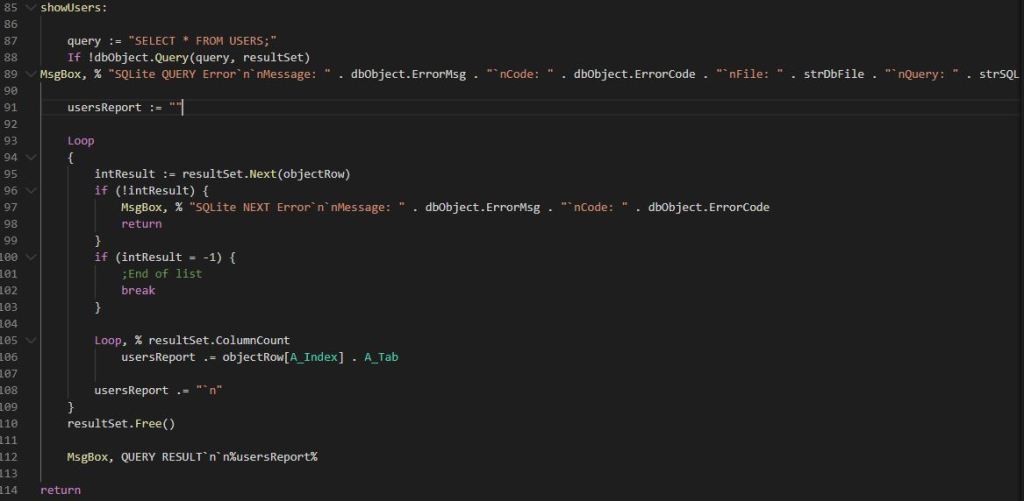
Showing the records in the table gets a little different if we were to do it in Java, the query is the same but where it gets kind of confusing is how we literate each row and there’s different ways to do it but for this blog it is simplified to hopefully help with understand how it works. To execute the query in Line 88 we use the method Query() passing in the query to execute and the resultSet that it will return the rows in the table.
In the loop at line 95 we have to check the state of the row whether there’s an error, end of the list, or a row that we can read which we use the method Next() passing in objectRow that will set that variable to the row that we are currently reading.
Line 105 we literate through each column of the row and concatenate to the report which will display all the users in the table.
Note: A_Tab like pressing the tab button adding spaces. `n inserts a new line for the next row
The last and important part of result set that we do is that when we are done reading the rows we want to release the resources by calling the Free() method, line 110.
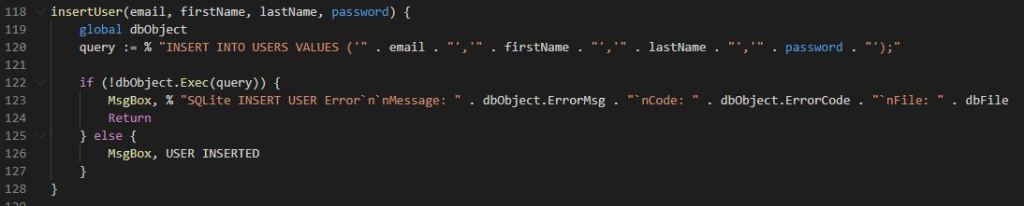
In insertUser() function we use the key work “global” to use the variable dbObject that was introduced in the second blog. The query is a little different in line 120 we use % to say that anything that’s not wrapped in quotes is a variable and . dot is concatenate (in java would be + ).


This is the end of this blog as it becoming longer than I would like, so my next blog I will integrate this database concept with our GUI that was introduced last blog. To sum it all up we learned how to install SQLite and used a library to gain the ability to create database in AutoHotKey and learned SQL basics statements. The next blog probably will be the last blog on AutoHotKey.
In my previous blog I went through the introduction about AutoHotKey and in this blog I will introduce you to GUI or Graphical User Interface. Before I do start, I want mention that the final version can be found here: GitHub, created by Asger Juul Brunshøj, you can also use this to follow along to understand what this script is doing.
The prerequisites are there so that you can understand what is going on in the blog and future blogs. Understand how to create a script with Hotkey and how to run the script is needed. The basics can be found in the previous blog in creating a simple script, in short understand the syntax, Run, Send, and MsgBox. Flow control is the flow of how the script is running and understand how an if statements works. To also add that wasn’t mention in the prerequisites list is that I will be going back and forth with Java as it is a common programming language and I’m very conformable with but it is not needed to understand how to create a GUI script.
Label is like a function but has no arguments to pass in. When called it will execute the commands below the label where it was declared until it reaches the Return or Exit then it returns to where the label was called. Label are used when want to have a callback in a GUI, define a variable in a label globally or use a variable in a global scope.

To create a label, you need a label name to call that label later (myLabel), followed by a colon to declare a label, add commands to do something you want it to do and ending with the Return.
Gosub allows you to execute a defined label or jumps to the label and execute and return back to Gosub and continue execution, unlike Goto jumps to the label and never return backs to Goto and continue on. This link: Gosub vs Goto explains why we are using it, and another reason why is because Goto can’t jump outside of a function to execute a label.

Global allows you to use a variable outside from a function instead of a parameter as it can get messy if there is a lot of arguments passed in or you can use it to declare a global variable if it doesn’t exist.

There are many directives that we can use but we will be using #Include which allows us to combine other scripts into one script for readability reasons.

For #Include to work we use %A_ScriptDir% for a relative path of the current script’s path and import the script that we want to include by specifying the script file name or any other subfolder the script is in.
To start off we are going to create a file structure for readability sake.

To run the script, we will only run “Host.ahk” script as it will include the other scripts needed to run properly. The GUI folder will contain GUI.ahk the script to create the GUI and UserCommands.ahk are the commands that are implemented.

Important thing to note is the SetCapsLockState, AlwaysOff as we will be using caps lock to trigger the GUI script and is not needed if you change the key trigger in GUI.ahk


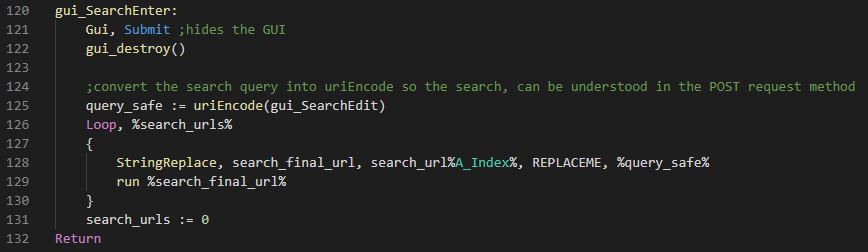
This converts the searched that you input for Google search, or Reddit for an example into readable search query. If you want to learn more there’s a link in the resources section about URI encoding.

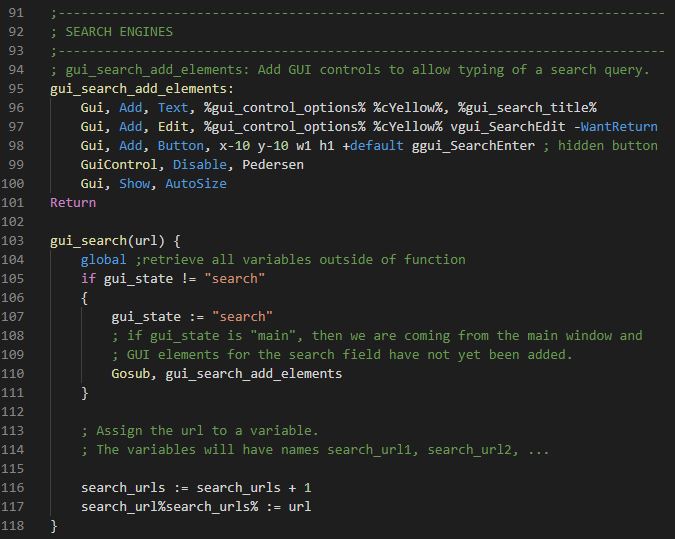
To launch the GUI, we created a Hotkey assigned to caps lock and space. Line 44 we check the GUI state to allow dynamic functionality to it, allowing open and close to the GUI and later we add additional element to the GUI, for example we enter “/” for Reddit as a command it creates new element(aka control) for the search query for that website.
When we add things like text, button, or checkbox in AHK it’s referred as “control” or in Java JTextField, JButton, JCheckBox.
The standard to creating a GUI is create it first with all its controls (Swing components in Java) then display the GUI on screen just like in Java.

This add a text field with the style option of the variable gui_control_options. Whenever user input in the text field it set that to the variable Pedersen and notice that it has a prefix of v for output variable and gFindus is the g-label a callback function with the prefix of g.


Here we enter “/” a command to search in a subreddit on Reddit which adds two controls: one being the “/r/” known as subreddit and the other is a text field.
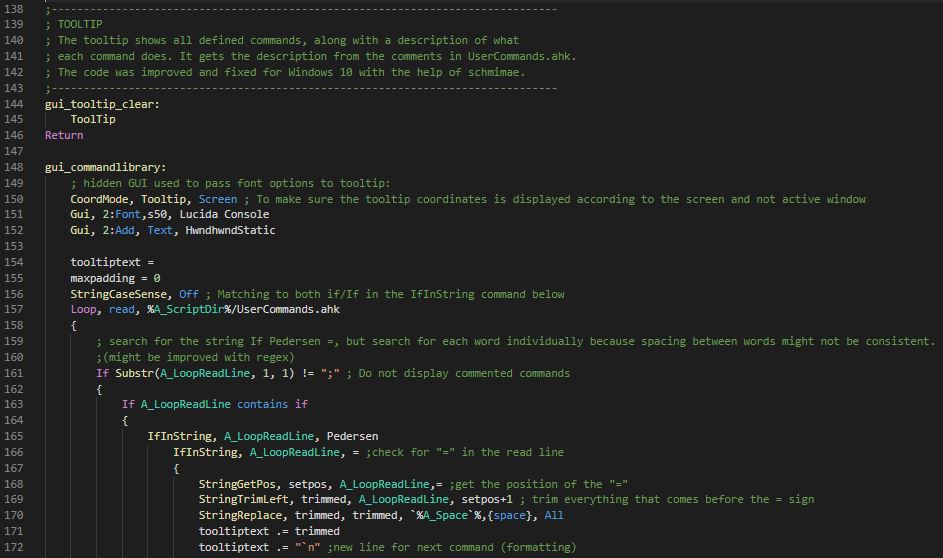


This script contains all the implemented commands that you can enter. Feel free to add your own commands following the syntax structure as the tooltip will read this file.


This is the end of this intermediate-advance to AutoHotKey. There’s one more blog going into more advance level of using AutoHotKey that I will be posting.
In this blog I hope to teach you about AutoHotKey and how to create a script with AutoHotKey for those interested in learning this language themselves. Before going ahead, I do want to mention that AutoHotKey is created for Microsoft Windows and every example shown is created with Notepad++ for those interested, Notepad++ download can be found at this Link: https://notepad-plus-plus.org/downloads/.
To start, AutoHotkey is a scripting language for Microsoft Windows, allowing simple to complex script creation. This scripting language is mainly used for “macro key” or in simple terms a press of a button will do something you tell it. AutoHotKey is not only limited to macro key also known as “Hot Key”. In addition, you are able also even build a Graphical User Interface working with an API (look forward for that blog).
AutoHotKey is used in many ways in assisting your frequent tasks, such as opening your favorite browser, typing out your common commands and many more. This scripting language is used ranging from gamers to developers or even anyone with a script and knows how to execute the script and press a button.
Why AutoHotKey over other scripting language such as Python, AutoIT? Well the truth is, it depends on you. Here are some suggestions to help you with deciding whether AutoHotKey is for you:
Installing AutoHotkey should be simple and can be found here: https://www.autohotkey.com/, downloading the latest version of AutoHotKey is what I chose and the default installation.
This blog covers the basics that AutoHotKey can provide as there many other resources that goes in depth of each topic. Here are some resources that I do recommend you go check out:
Steps to create a Hotkey
:: – anything on the left side will perform an action assign to it.
Common modifiers
# – window
! – alt
^ – ctrl
+ – shift
& – assign multiple keys or combination.
Example:

2. Trigger action
Send – send keypress or even text. To send a keystroke you will have to encase in curly braces {}.
Example:

Sleep – a delay in milliseconds. It is recommended to use Sleep as execution may be too fast resulting in you having to press the hotkey again.
Example:

3. Finish Hotkey using Return
Now that we are done with the long talk, time to create a script with that we learned:
To start off we are going to assign alt and mouse button to search the highlighted word(s) on your favorite browser. I chose this script because I have often seen myself searching up terms that are unfamiliar to me:

What is going on here? The on the left side of “::” is the macro key assigned to execute everything below until it reaches the “return” to terminate the hotkey. “Send” simulates key press of “^” (ctrl) and “c” to copy the highlighted word(s). “Sleep” is the amount of time before the script continues execution in milliseconds. Lastly “Run” works like Window key + r and search of what has been copied using the reserved variable clipboard of what you copied “%clipboard%” surrounding with %.
This is the end of this introduction to AutoHotKey with understanding what AutoHotKey can offer and getting started with development with this. There a lot more to come with different levels of using AutoHotKey that I will be posting, so look out for that.
