My Goal
In this blog I hope to teach you about AutoHotKey and how to create a script with AutoHotKey for those interested in learning this language themselves. Before going ahead, I do want to mention that AutoHotKey is created for Microsoft Windows and every example shown is created with Notepad++ for those interested, Notepad++ download can be found at this Link: https://notepad-plus-plus.org/downloads/.
AutoHotKey Introduction
- What is AutoHotKey?
- Why use AutoHotKey
- Installing AutoHotKey
- Resources
- Learning the basics
- Creating a script
What is AutoHotKey?
To start, AutoHotkey is a scripting language for Microsoft Windows, allowing simple to complex script creation. This scripting language is mainly used for “macro key” or in simple terms a press of a button will do something you tell it. AutoHotKey is not only limited to macro key also known as “Hot Key”. In addition, you are able also even build a Graphical User Interface working with an API (look forward for that blog).
So why AutoHotKey?
AutoHotKey is used in many ways in assisting your frequent tasks, such as opening your favorite browser, typing out your common commands and many more. This scripting language is used ranging from gamers to developers or even anyone with a script and knows how to execute the script and press a button.
Why AutoHotKey over other scripting language such as Python, AutoIT? Well the truth is, it depends on you. Here are some suggestions to help you with deciding whether AutoHotKey is for you:
- Creating a simple script?
- Looking for a scripting language that is beginner friendly?
- Scripting language experience
- A Community to learn with
- For fun!
Benefits to using scripts
- Time – saving the amount of time you must enter, click, press, or even wait for an event.
- Money – say if you work at a job that did manual work that you do over and over on the computer, you could create a script that did your job with a press of a button.
- Job – There are some Jobs looking for AutoHotKey developers, or experience in scripting language.
- Create a better experience in an application improving quality of life, by integrating/addon with the application. You can create a GUI that work with your application and can do even more if the application has an API that you can use.
Installing AutoHotKey
Installing AutoHotkey should be simple and can be found here: https://www.autohotkey.com/, downloading the latest version of AutoHotKey is what I chose and the default installation.
Resources
This blog covers the basics that AutoHotKey can provide as there many other resources that goes in depth of each topic. Here are some resources that I do recommend you go check out:
- https://www.autohotkey.com/docs/Tutorial.htm. An offline version can be found in the folder that you installed to, called “AutoHotkey.chm”. I highly recommend reading up on this if you want to further develop with AutoHotKey.
- https://www.autohotkey.com/boards/viewtopic.php?t=50. Notepad++ for AutoHotKey.
Learning the basics
Steps to create a Hotkey
- Assign a key(s) to trigger an action
:: – anything on the left side will perform an action assign to it.
Common modifiers
# – window
! – alt
^ – ctrl
+ – shift
& – assign multiple keys or combination.
Example:

2. Trigger action
Send – send keypress or even text. To send a keystroke you will have to encase in curly braces {}.
Example:

Sleep – a delay in milliseconds. It is recommended to use Sleep as execution may be too fast resulting in you having to press the hotkey again.
Example:

3. Finish Hotkey using Return
Creating a Script
Now that we are done with the long talk, time to create a script with that we learned:
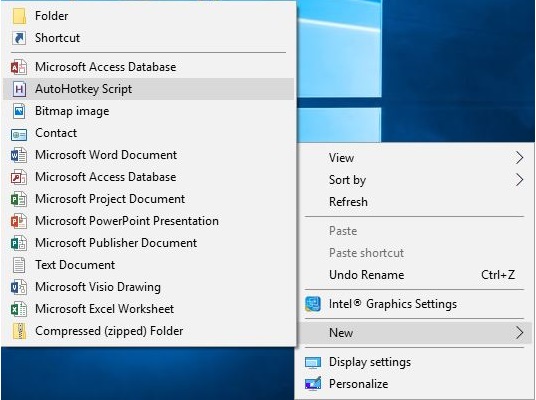
- Creating ahk file is the same as creating a new folder, right click in a directory or desktop -> new -> AutoHotKey script:
To start off we are going to assign alt and mouse button to search the highlighted word(s) on your favorite browser. I chose this script because I have often seen myself searching up terms that are unfamiliar to me:

What is going on here? The on the left side of “::” is the macro key assigned to execute everything below until it reaches the “return” to terminate the hotkey. “Send” simulates key press of “^” (ctrl) and “c” to copy the highlighted word(s). “Sleep” is the amount of time before the script continues execution in milliseconds. Lastly “Run” works like Window key + r and search of what has been copied using the reserved variable clipboard of what you copied “%clipboard%” surrounding with %.
This is the end of this introduction to AutoHotKey with understanding what AutoHotKey can offer and getting started with development with this. There a lot more to come with different levels of using AutoHotKey that I will be posting, so look out for that.

One thought on “Learn AutoHotKey”